
Spring brings a celebration of fresh flavors, and my pea and ricotta crostini recipe is the perfect way to welcome the season. This Italian-inspired spring appetizer combines creamy ricotta with vibrant green peas, creating a delightful bite that’s both elegant and simple to prepare.
My crostini recipe transforms ordinary ingredients into an extraordinary appetizer that will impress guests at any gathering. With just a few key components, you can craft a sophisticated starter that captures the essence of spring’s fresh produce.
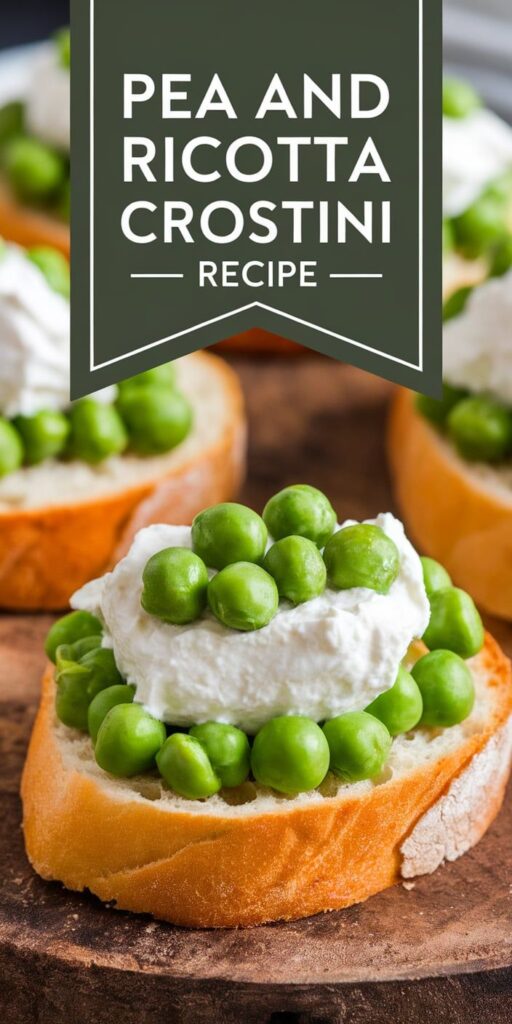
The beauty of this pea and ricotta crostini recipe lies in its simplicity. Crispy toasted bread serves as the perfect canvas for a smooth ricotta spread and bright, tender peas. Each bite offers a delicate balance of textures and flavors that will transport you straight to the Italian countryside.
Whether you’re hosting a dinner party or looking for a quick and impressive snack, this spring appetizer comes together in minutes. I’ll guide you through each step to create a restaurant-worthy dish right in your own kitchen.
Why You’ll Love These Italian-Inspired Crostini
As a passionate home cook, I’ve discovered the ultimate Italian appetizer that will transform your entertaining game. These pea and ricotta crostini are not just a simple snack – they’re a culinary experience that combines elegance with simplicity.
This easy crostini recipe offers multiple advantages that make it a standout choice for any gathering. Let me break down why these delightful bites will become your new go-to appetizer.
Perfect for Entertainment
Imagine serving a visually stunning Italian appetizer that looks like it came straight from a gourmet restaurant. These crostini are:
- Visually appealing with vibrant green peas
- Bite-sized for easy mingling
- Sophisticated yet simple to prepare
Make-Ahead Friendly
As a busy host, I appreciate recipes that reduce day-of stress. This make-ahead appetizer can be partially or fully prepared in advance:
- Bread can be toasted 1-2 days early
- Ricotta spread keeps for 3 days refrigerated
- Pea mixture stays fresh for 24 hours
Seasonal Versatility
One of the best aspects of this recipe is its adaptability. You can easily swap ingredients based on seasonal availability, making it a year-round favorite for entertaining.
Essential Ingredients for Pea and Ricotta Crostini Recipe
Crafting the perfect pea and ricotta crostini starts with selecting high-quality crostini ingredients that will elevate your appetizer from simple to spectacular. I’ve carefully chosen each component to ensure maximum flavor and texture in every bite.
For the base of my crostini, you’ll need a crisp baguette or rustic Italian bread. The bread should be fresh and crusty, creating the ideal canvas for our delicious toppings. My recommended ingredients include:
- 1 fresh baguette
- Extra virgin olive oil
- Kosher salt
The star of this recipe is the creamy ricotta cheese. I recommend using a high-quality, fresh ricotta that’s smooth and rich. Fresh peas are another crucial ingredient that brings vibrant color and sweet flavor to the dish. Look for bright green, plump peas – either freshly shelled or high-quality frozen varieties work wonderfully.
Additional ingredients to complement the main components include:
- Fresh mint leaves
- Lemon zest
- Cracked black pepper
- Flaky sea salt
Pro tip: When selecting fresh peas, choose ones that are bright green and firm. If fresh peas aren’t in season, frozen peas can be an excellent substitute. The key is to capture that sweet, garden-fresh flavor that makes these crostini truly special.
Kitchen Tools and Equipment Needed
Preparing delicious crostini requires the right kitchen equipment for appetizers. I’ll guide you through the essential crostini tools you’ll need to create a perfect appetizer that will impress your guests.
Gathering the right kitchen tools before starting your recipe ensures a smooth cooking experience. Let’s break down the necessary equipment into three key categories.
Bread Preparation Tools
- Sharp serrated bread knife
- Cutting board
- Baking sheet
- Olive oil brush
- Parchment paper
Pea Mixture Equipment
- Food processor or blender
- Measuring cups
- Measuring spoons
- Medium mixing bowl
- Rubber spatula
Assembly Essentials
- Offset spatula
- Serving platter
- Sharp chef’s knife
- Microplane or fine grater
| Tool Category | Primary Function | Recommended Quality |
|---|---|---|
| Bread Knife | Slicing bread evenly | Stainless steel, sharp serrated edge |
| Food Processor | Preparing pea mixture | High-powered, multiple blade attachments |
| Mixing Bowls | Combining ingredients | Stainless steel or ceramic, various sizes |
With these crostini tools and kitchen equipment for appetizers, you’ll be well-prepared to create a stunning Italian-inspired dish that’s both delicious and visually appealing.
Making the Perfect Crostini Base
Creating delicious homemade crostini starts with selecting the right bread. I recommend using a fresh French baguette for the best results. The key to amazing toasted baguette slices is careful preparation and attention to detail.
Begin by choosing a high-quality baguette that’s slightly firm but not too hard. Slice the bread diagonally into thin, uniform pieces about 1/4 to 1/2 inch thick. Consistency is crucial for even toasting.
- Choose a fresh baguette with a crisp exterior
- Use a sharp serrated knife for clean cuts
- Aim for uniform slice thickness
- Cut at a 45-degree angle for maximum surface area
To transform your bread into perfect homemade crostini, arrange the slices on a large baking sheet. I drizzle each slice with extra-virgin olive oil, ensuring a light and even coating. Sprinkle a pinch of sea salt and freshly ground black pepper to enhance the flavor of your toasted baguette slices.
Preheat your oven to 375°F (190°C). Bake the bread for 8-10 minutes, watching carefully to prevent burning. The goal is achieving a golden-brown color and crispy texture that provides the ideal base for your crostini.
Pro tip: Let the toasted baguette slices cool completely before adding toppings. This ensures they maintain their crunch and won’t become soggy when you’re ready to serve your delightful appetizer.
Creating the Creamy Ricotta Spread
Crafting the perfect ricotta spread is an art that can elevate your crostini from simple to spectacular. I’ll walk you through my favorite techniques for creating a deliciously seasoned ricotta for crostini that will impress your guests.
The key to an exceptional ricotta spread lies in selecting high-quality ingredients and mastering a few simple preparation techniques. Start with fresh, creamy ricotta cheese as your base – preferably from a local dairy or specialty cheese shop.
Seasoning Tips
To transform your ricotta spread into a flavor-packed delight, I recommend the following seasoning approach:
- Zest of one fresh lemon
- Finely chopped fresh herbs (basil, chives, or thyme)
- Cracked black pepper
- Pinch of sea salt
Texture Enhancement
Achieving the perfect texture for your ricotta spread requires a gentle touch. I suggest using a fork to whip the ricotta until it becomes light and airy. This technique helps incorporate air and creates a smooth, spreadable consistency ideal for crostini.
Storage Methods
The beauty of this seasoned ricotta for crostini is its make-ahead potential. Store your ricotta spread in an airtight container in the refrigerator for up to 3-4 days. Pro tip: Let it come to room temperature before serving to maximize flavor and spreadability.
By following these simple steps, you’ll create a ricotta spread that’s not just a topping, but the star of your appetizer spread. The combination of fresh ingredients and careful preparation will transform your crostini into a gourmet experience.
Fresh Pea Topping Preparation
Crafting the perfect fresh pea topping is the heart of this spring pea recipe. I’ll walk you through transforming simple peas into a vibrant, delicious garnish that elevates your crostini from good to extraordinary.
Start by selecting the freshest peas possible. For the best spring pea recipe results, choose bright green, plump peas that feel firm to the touch. If using fresh peas, briefly blanch them to preserve their vivid color and sweet flavor.
- Select bright green, firm peas
- Blanch for 1-2 minutes in boiling water
- Immediately transfer to ice water to stop cooking
- Drain and pat dry
To enhance the fresh pea topping, I recommend adding a few simple seasonings. A pinch of sea salt, freshly ground black pepper, and a touch of lemon zest can dramatically boost the peas’ natural sweetness. For an extra layer of flavor, consider mixing in some finely chopped fresh mint or chives.
Pro tip: If you’re short on time, frozen peas work wonderfully too. Just thaw them completely and pat dry before seasoning. The key is to keep the peas light, bright, and bursting with spring freshness.
Your pea topping should be vibrant, not mushy. Gentle handling preserves the peas’ delicate texture and ensures they’ll be the star of your crostini.
Assembly and Serving Suggestions
When it comes to crostini assembly, precision and creativity are key. I recommend starting with a carefully toasted baguette slice as your canvas. Spread a generous layer of creamy ricotta across each piece, ensuring an even coating that will serve as the perfect base for your appetizer presentation.
Next, gently spoon the vibrant fresh pea mixture on top of the ricotta. I like to use a small spoon to create delicate mounds that look artfully placed. For an extra touch of elegance, consider garnishing with fresh mint leaves or a light drizzle of high-quality olive oil to enhance the visual appeal of your crostini.
Serving these appetizers is an art form. I suggest arranging them on a rustic wooden board or slate platter for maximum impact. Pair these delightful bites with a crisp white wine like Pinot Grigio or a sparkling Prosecco. Pro tip: prepare these just before serving to maintain the perfect texture and temperature of your crostini.
For large gatherings, you can pre-toast the bread and prepare the ricotta spread in advance. Simply assemble the crostini right before your guests arrive to ensure they remain crisp and fresh. Your guests will be impressed by the sophisticated yet approachable nature of this delicious appetizer.